
vue3 setup法语糖使用技巧与方法,即 vue 中 data、computed、methods、watch 等内容非常多以后,经常需要根据 data 中的数据去搜索找到对应的 methods 方法,上下跳跃查看代码,非常不方便,vue3 中新增了 setup,它的出现是为了解决组件内容庞大后阅读便利。
看代码时,经常需要根据 data 中的数据去搜索找到对应的 methods 方法,上下跳跃查看代码,非常不方便。而在 setup 中,则可以把 data 中的数据和 methods 方法写在相临的位置,方便查看和维护。本文详细介绍 setup 的用法
1、简单使用
先简单写一下看看效果
笔者这里使用新建的 vue3 项目,直接在 App.vue 上进行修改
<template>
  <div>{{name}}</div>
</template>

<script>
export default {
  setup() {
    return {
      name: "泪眼问花花不语,乱红飞过秋千去"
    }
  }
}
</script>
原来写在 data 中的 name,在 setup 中需要 return 返回
运行效果

2、修改 setup 中的变量值
先看下面代码,再说在 setup 中如何修改
<template>
  <div>
    {{name}}
    <button @click="change">修改</button>
  </div>
</template>

<script>
export default {
  setup() {
    let name = "泪眼问花花不语,乱红飞过秋千去"
    function change() {
      name = "人生自是有情痴,此恨不关风与月"
    }
    return {
      name,
      change
    }
  }
}
</script>
按照常规逻辑,修改 setup 中的 name,会自然地写出上面的代码
但是这段代码是不能完成 name 值的修改的,看运行效果
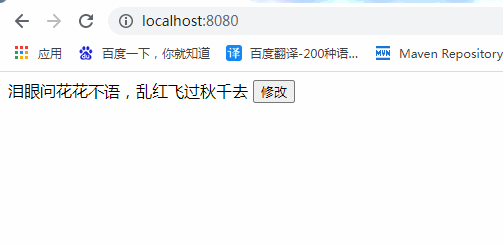
为什么 name 值没有改变呢?因为上面代码中 name 是非响应式的
如果想要修改 name 值,就需要把它改成响应式的,代码如下
<template>
  <div>
    {{name}}
    <button @click="change">修改</button>
  </div>
</template>

<script>
import { ref } from 'vue'
export default {
  setup() {
    let name = ref("泪眼问花花不语,乱红飞过秋千去")
    function change() {
      name.value = "人生自是有情痴,此恨不关风与月"
    }
    return {
      name,
      change
    }
  }
}
</script>
使用 ref 对 name 进行包装
修改时使用 变量名.value 的语法
运行效果

除了使用 ref 外还可以使用 reactive ,二者都可以将原始数据类型转换成一个带有响应式特性的数据类型
ref 和 reactive 有什么区别,ref 一般处理基本类型;reactive 处理复杂的数据类型
reactive 使用代码
<template>
  <div>
    {{nameObj.name}}
    <button @click="change">修改</button>
  </div>
</template>

<script>
import {reactive} from 'vue'
export default {
  setup() {
    let nameObj = reactive({name: '今年花胜去年红。可惜明年花更好,知与谁同'})
    function change() {
      nameObj.name = "离愁渐远渐无穷,迢迢不断如春水"
    }
    return {
      nameObj,
      change
    }
  }
}
</script>
运行效果

3、setup 形式下的父子组件通信
代码写成 setup 形式,如何实现父子组件通信,下面介绍
3.1、父传子
在 components 目录下新建 Article.vue 作为子组件
Article.vue 内容
<template>
  <div>
    {{msg}}
    {{info}}
  </div>
</template>

<script>
export default {
  props:['msg'],
  setup(props) {
    console.log(props.msg)

    return {
      info:props.msg
    }
  }
}
</script>
在 setup 方法内使用 props 来接收父组件传过来的数据
App.vue 为父组件
在 App.vue 中引入 Article.vue
<template>
  <div>
    <Article :msg="name"></Article>
  </div>
</template>

<script>
import Article from '@/components/Article.vue'
export default {
  components: {
    Article
  },
  setup() {
    return {
      name: '渐行渐远渐无书,水阔鱼沉何处问'
    }
  }
}
</script>
运行效果

3.2、子传父
3.2.1、子组件调用父组件方法
Article.vue 内容
<template>
  <div>
    {{msg}}
    <button @click="sendToParent">子组件向父组件传递数据</button>
  </div>
</template>

<script>
export default {
  props:['msg'],
  setup(props, content) {
    console.log(props.msg)
    function sendToParent() {
      content.emit('change')
    }
    return {
      sendToParent
    }
  }
}
</script>
使用 setup 方法中 content 参数中的 emit
App.vue 内容
<template>
  <div>
    <Article :msg="name" @change="changeName"></Article>
  </div>
</template>

<script>
import Article from '@/components/Article.vue'
export default {
  components: {
    Article
  },
  setup() {
    function changeName() {
      alert('父组件事件被调用')
    }
    return {
      name: '渐行渐远渐无书,水阔鱼沉何处问',
      changeName
    }
  }
}
</script>
运行效果

3.2.2、子组件向父组件传递数据
子组件向父组件传递数据,父组件修改数据
Article.vue 内容
<template>
  <div>
    {{msg}}
    <button @click="sendToParent">子组件向父组件传递数据</button>
  </div>
</template>

<script>
export default {
  props:['msg'],
  setup(props, content) {
    console.log(props.msg)

    let newName = '群芳过后西湖好,狼籍残红。飞絮濛濛。垂柳阑干尽日风'
    function sendToParent() {
      content.emit('change', newName)
    }
    return {
      sendToParent
    }
  }
}
</script>
App.vue 内容
<template>
  <div>
    <Article :msg="name" @change="changeName"></Article>
  </div>
</template>

<script>
import Article from '@/components/Article.vue'
import {ref} from 'vue'
export default {
  components: {
    Article
  },
  setup() {
    let name = ref('渐行渐远渐无书,水阔鱼沉何处问')
    function changeName(msg) {
      name.value = msg
    }
    return {
      name,
      changeName
    }
  }
}
</script>
App.vue 中的 name 要修改,所以使用 ref 包装
运行效果

4、setup 中使用生命周期函数
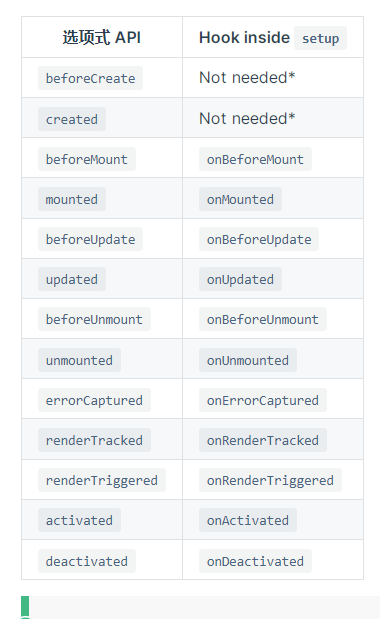
在 setup 里,生命周期钩子前面加上 “on” 来访问组件的生命周期钩子
setup 是围绕 beforeCreate 和 created 生命周期钩子运行的,所以不需要显式地定义它们
setup 内部调用生命周期钩子
代码示例
<template>
  <div></div>
</template>

<script>
import { onBeforeMount, onMounted } from "vue"
export default {
  setup() {
    onBeforeMount(()=>{
      console.log('onBeforeMount')
    })
    onMounted(()=>{
      console.log('mouted')
    })
    return {}
  }
}
</script>
运行效果

Vue Setup语法糖使用方法,与setup函数不同的是,在script标签中添加setup
1、变量、方法不需要 return 出来,属性和方法也不用返回,也不用写setup函数,也不用写export default ,甚至是自定义指令也可以在我们的template中自动获得
<script setup>
    import { ref } from 'vue';

    <!-- flag变量不需要在 return出去了 -->
    let flag = ref("ABCD")

    <!-- 函数也可以直接引用,不用在return中返回 -->
    let changeHander = ()=>{
        flag.value='qwe'
    }
</script>
2、组件不需要在注册
使用组件,只需要引入组件就可以直接使用,不需要再在components中注册(组件命名采用的是大驼峰)
3、defineProps 组件传参
父组件传参:
<template>
  <div class="home">
    <test-com :info="msg" time="42分钟"></test-com>
  </div>
</template>

<script setup>
    import TestCom from "../components/TestCom.vue"
    let msg='消息'
</script>
子组件接收参数:
<script setup>
    import {defineProps} from 'vue'
    defineProps({
        info:{
            type:String,
            default:'----'
        },
        time:{
            type:String,
            default:'0分钟'
        },
    })
</script>
4、defineEmits 组件抛出事件
父组件:
<template>
  <div class="home">
    <test-com @myAdd="myAddHander" @myDel='myDelHander'></test-com>
  </div>
</template>

<script setup>
    import TestCom from "../components/TestCom.vue"
    let myAddHander=(mess)=>{
      console.log('新增==>',mess);
    }
    let myDelHander=(mess)=>{
      console.log('删除==>', mess);
    }
</script>
子组件接收:
<template>
    <div>
        <h2> 你好 </h2>
        <button @click="hander1Click">新增</button>
        <button @click="hander2Click">删除</button>
    </div>
</template>

<script setup>
    import {defineEmits} from 'vue'
    //  使用defineEmits创建名称,接收一个数组
    let $myemit=defineEmits(['myAdd','myDel'])
    let hander1Click = ()=>{
        $myemit('myAdd','新增的数据')
    }
    let hander2Click = ()=>{
        $myemit('myDel','删除的数据')
    }
</script>
5、defineExpose获取子组件中的属性值
子组件:
<script setup>
    import { reactive, ref,defineExpose } from "vue";
    let sex=ref('男')
    let info=reactive({
        like:'喜欢李',
        age:27
    })
    // 将组件中的属性暴露出去,这样父组件可以获取
    defineExpose({
        sex,
        info
    })
</script>
父组件:
<template>
  <div class="home">
    <test-com ref="testcomRef"></test-com>
    <button @click="getSonHander">获取子组件中的数据</button>
  </div>
</template>

<script setup>
    import TestCom from "../components/TestCom.vue"
    import {ref} from 'vue'
    const testcomRef = ref()
    const getSonHander=()=>{
      console.log('获取子组件中的性别', testcomRef.value.sex );
      console.log('获取子组件中的其他信息', testcomRef.value.info );
    }
</script>
6、style v-bind
style中绑定变量,v-bind('变量')
<template>
  <span> 开始... </span>
</template>

<script setup>
  import { reactive } from 'vue'
  const state = reactive({
    color: 'red'
  })
</script>

<style scoped>
  span {
    /* 使用v-bind绑定state中的变量 */
    color: v-bind('state.color');
  }
</style>